About Smile Brilliant
Smile Brilliant is a dental lab in St. Louis, MO dedicated to making professional teeth whitening affordable for the majority. Dentist will charge $350-$1,000 (in some cities $1,000+) for custom teeth whitening trays; however at Smilebrilliant.com they retail at $89.95. When you visit the dentist for custom teeth whitening trays the assistant will take an impression of your upper and lower teeth from which they create a mold, and then use the mold to make trays that form to your teeth with precision. Some dentist opt to outsource the mold and tray creation to a lab such as Smile Brilliant while others have an assistant do it in office. Either way the entire process takes about 1-2 weeks after they take your impression.
Smilebrilliant.com Custom Teeth Whitening Trays VS. In-Office Custom Teeth Whitening Trays
- Save $250-$900 on custom bleaching trays (varies by city/dentist)
- Save money on Gel: the average dentist charges $15-$20 for a syringe containing 1ml (about 1 treatment) of teeth bleaching gel. At smilebrilliant.com you 3ml of teeth bleaching gel for as little as $7.77
- Save time: by going to the dentist you will need to set up an appointment and allot about 1 hour in your schedule to visit the office and have your impression taken. At smilebrilliant.com you do it all at home and in a matter of a few minutes while saving several hundred dollars.
- Limited Life Time Tray Replacement Warranty: in the event you lose or damage your trays we will keep your dental molds on file for 2 years. Simply email or call us and we will create a new set of trays for you at no cost. If two years have passed and we no longer have your impressions on file we will sell you a new kit at 50% off for you to take a new set of impressions.
- Satisfaction Guaranteed: in the event your trays do not fit well, we will send you additional impression material at no cost for a retake as long as its within 30 days of the customers initial order date.
Who should NOT use teeth whitening:
- Teenagers who have not developed all of their permanent teeth
- Those with existing cavities will experience extreme sensitivity from the carbamide peroxide whitening gel.
- Those with damaged tooth enamel. When enamel is missing and the tooth’s dentin is exposed the bleaching gel will cause sensitivities
- Expecting mothers or mothers who are breast feeding
- Those with gingivitis, periodontal disease, or receding gums
Smilebrilliant’s teeth whitening/bleaching gel is composed:
- Glycerin 77.1% (the gel)
- Carbamide Peroxide 22% (dental grade bleaching agent)
- Carbomer 0.5% (absorbs liquids)
- Menthol 0.2% (flavoring)
- EDTA 0.2% (dissolvent)
Click here to view the safety data information provided by the manufacturer
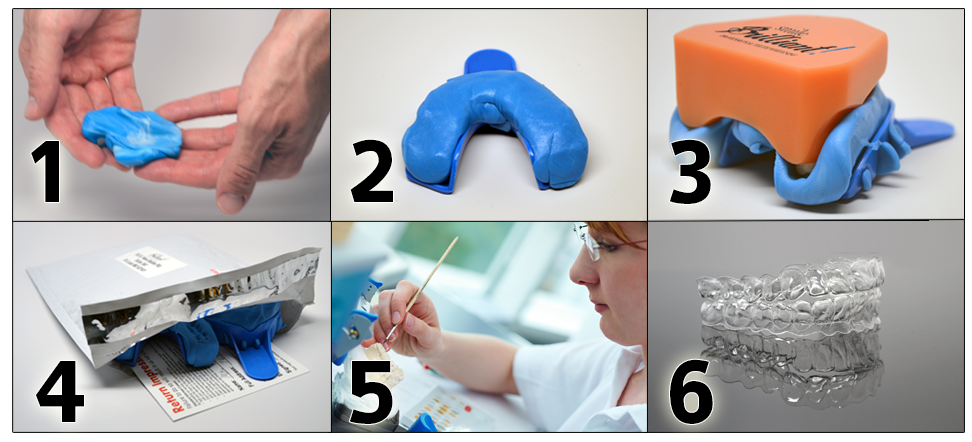
Teeth whitening tray creation process:
When you purchase a custom teeth whitening tray creation kit from smilebrilliant.com the kit will arrive in 1-3 business days. Once received you will follow the instructions provided to take your dental impressions (upper and lower). Kits come with 3 sets of impression material in case you make a mistake and need to redo one. After taking your impressions put them into the pre-paid, pre-addressed envelope and mail them back to the Smile Brilliant Lab. You will be notified via email when your impressions have been received (about 1-3 business days) and your trays will be created and shipped within 2-7 business days of receiving them. Once created and shipped back to you an email will be sent with a USPS tracking number. The entire process takes 10-14 days which is roughly the same duration it would take if you went to the dentist.
Step 1: Mix 1 catalyst and 1 base paste together until a solid blue
Step 2: set paste in the impression tray
Step 3: press the tray into teeth so that it covers the gum line
Step 4: Mail Impression to the Smile Brilliant Dental Lab
Step 5: A Smile Brilliant Lab Technician uses the impressions to create a molding of the teeth from which the custom teeth whitening trays are created.
Step 6: Receive your custom teeth whitening trays in the mail within 10 days of shipping them to the lab!
If in your article your article you mention the tray creation process please link to this page.
How to use trays and teeth whitening gel:
When using the whitening/bleaching gel you want to keep in mind that there is no real need to whiten the back side of your teeth. With that being said you want to position the gel in the tray to ensure it only comes in contact with the front surface of each tooth as shown in the image below. I went ahead and highlighted the gel in blue for better visibility.
When inserting the trays onto the teeth you want to minimize the amount that is pushed to the bottom of the tray. With that being said you will drag your teeth from the back side of the tray in a way that presses your teeth directly onto the gel as shown in the image with the teeth.
Avoid putting too much gel into the trays because excess gel will be forced out of the tray and into the mouth causing irritation to the tissues of the mouth. In the event this happens simply wipe away the excess with a tissue.
Keep in mind that one gel syringe is good for about 3-4 full treatments of both upper and lower teeth.


